Signed in as:
filler@godaddy.com
HOW TO APPLY STRIP LASHES & ADHESIVE LINER
IMPORTANT: Please ensure that your eyelid is free from oil before applying our lash adhesive. This will drastically improve the adhesive's hold. For oily lids, please cleanse the eye area and ensure it is completely dry.
DO NOT use the cleansing oil to clean your lashes as this will cause them to fall apart. The cleansing oil is strictly for removing the adhesive from your eyelid.
DO NOT use an oil-based mascara with the false eyelashes.
Pull the cap off to remove the cap. Please do not unscrew the pen.
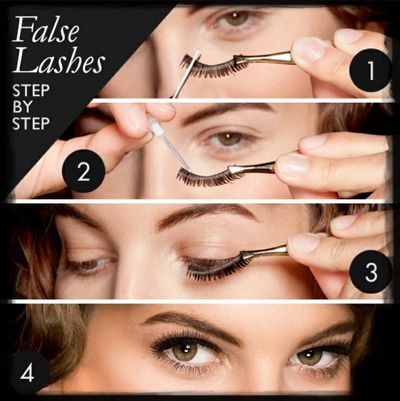
Instructions
Hold your falsies against your eyes to gauge the length of the lashes. Trim the lashes down to size with a pair of scissors, if necessary. Trim carefully and from the outer end!
1. Make sure your eyelids are clean and free from any oil. You can use a non-oil-based cleanser to achieve oil-free lids.
2. If using mascara, please apply the mascara before applying your lashes. This will help you make the most of your reusable lashes!
3. Roll each lash around your finger for 1 minute. This will help them take shape and will prevent the ends lifting.
Step 2A - Application (Method 1 - Best option for black adhesive & clear adhesive with light/no makeup)
1. Shake your Flick & Stick pen well!
2. Apply your adhesive eyeliner to your lash line as you would like any normal eyeliner. Add a touch more liner to the inner and outer corners for extra hold.
3. Apply the lashes by starting with the inner corners then lightly pressing along the lash line securing the lashes in place and adjust, as necessary. Pinch and press down near the roots of the lashes to set them. Touch up with pen if required.
4. Please clean your Flick & Stick pen regularly to remove makeup residue. You can do this by soaking a cotton pad in micellar water and gently swiping the pen tip. This will also stop it from drying out!
Step 2B - Application (Method 2 - Best option for applying clear adhesive on top of heavier makeup)
1. Shake your Flick & Stick pen well!
2. Apply your adhesive eyeliner to the false lash band and place the lash (starting with the inner corner) on your lash line. With our unique adhesive formula, you will be able to reposition the lash until you get it perfect!
3. Apply the lashes by starting with the inner corners then lightly pressing along the lash line securing the lashes in place and adjust, as necessary. Pinch and press down near the roots of the lashes to set them. Touch up with pen if required.
4. Please clean your Flick & Stick pen regularly to remove makeup residue. You can do this by soaking a cotton pad in micellar water and gently swiping the pen tip. This will also stop it from drying out!
Step 3 - Removal
1. When removing, detach your false lashes slowly from the outer corners. No sticky glue means no ripped- out eyelashes and easy removal!
2. You can use our cleansing oil with a cotton pad to wipe away the adhesive after use. Micellar water also works well. 3. After each use, please place the lashes back into their tray to retain their shape. No crusty glue means they will be good to wear again right after removal!
4. Care Tip: We recommend cleaning the tip of your adhesive pen regularly. You can do this with micellar water and a cotton pad. We also recommend cleaning any residue off your lashes after every 4/5 uses. You can do this with a cotton bud & any non-oil-based makeup remover. You can also store your pen upside down to keep fluid running to the tip. Always shake well before use! If you follow this guidance, you will get 20+ uses out of your lashes with ease!

IMPORTANT: Please ensure that your eyelid is free from oil before applying your magnetic eyeliner, this will drastically improve the eyeliner's hold - For oily lids, please cleanse the eye area and ensure it is completely dry.
For best results, apply a non-oil based eye primer. Alternatively, you can dust with powder or use eye shadow as a base.
DO NOT use the cleansing oil to clean your magnetic lashes as this will cause them to fall apart. The cleansing oil is strictly for removing eyeliner from your eyelid.
DO NOT use an oil based mascara with the false eyelashes.
Please remove the eyeliner and eyelashes fully before going for an MRI scan.
Instructions
Step 1 - Preparation
Step 2 - Liner Application
Step 3 - Lash Application
Step 4 - Removal

FASTER APPLICATION, WIND RESISTANT, WATERPROOF & RE-USABLE LASHES UP TO 20+ WEARS